Temporal Client - Python SDK
This guide introduces Temporal Clients. It explains the role and use of Clients and shows you how to configure your Python Client code to connect to the Temporal Service.
The pages shows how to do the following:
- Connect to a local development Temporal Service
- Connect to Temporal Cloud
- Start a Workflow Execution
Connect to development Temporal Service
How to connect to the local Temporal CLI development Temporal Service using the Python SDK
A Temporal Client enables you to communicate with the Temporal Service. Communication with a Temporal Service includes, but isn't limited to, the following:
- Starting Workflow Executions.
- Sending Signals to Workflow Executions.
- Sending Queries to Workflow Executions.
- Getting the results of a Workflow Execution.
- Providing an Activity Task Token.
A Temporal Client cannot be initialized and used inside a Workflow. However, it is acceptable and common to use a Temporal Client inside an Activity to communicate with a Temporal Service.
When you are running a Temporal Service locally (such as the Temporal CLI), the number of connection options you must provide is minimal.
Many SDKs default to the local host or IP address and port that Temporalite and Docker Compose serve (127.0.0.1:7233).
Use the connect() method on the Client class to create and connect to a Temporal Client to the Temporal Service.
View the source code
in the context of the rest of the application code.
# ...
async def main():
    client = await Client.connect("localhost:7233")

    result = await client.execute_workflow(
        YourWorkflow.run,
        "your name",
        id="your-workflow-id",
        task_queue="your-task-queue",
    )

    print(f"Result: {result}")


if __name__ == "__main__":
    asyncio.run(main())
Connect a Temporal Client to a Temporal Service
How to connect to a Temporal Service
A Temporal Client enables you to communicate with the Temporal Service. Communication with a Temporal Service includes, but isn't limited to, the following:
- Starting Workflow Executions.
- Sending Signals to Workflow Executions.
- Sending Queries to Workflow Executions.
- Getting the results of a Workflow Execution.
- Providing an Activity Task Token.
A Temporal Client cannot be initialized and used inside a Workflow. However, it is acceptable and common to use a Temporal Client inside an Activity to communicate with a Temporal Service.
When you are running a Temporal Service locally (such as the Temporal CLI), the number of connection options you must provide is minimal.
Many SDKs default to the local host or IP address and port that Temporalite and Docker Compose serve (127.0.0.1:7233).
Use the connect() method on the Client class to create and connect to a Temporal Client to the Temporal Service.
View the source code
in the context of the rest of the application code.
# ...
async def main():
    client = await Client.connect("localhost:7233")

    result = await client.execute_workflow(
        YourWorkflow.run,
        "your name",
        id="your-workflow-id",
        task_queue="your-task-queue",
    )

    print(f"Result: {result}")


if __name__ == "__main__":
    asyncio.run(main())
Connect to Temporal Cloud
How to connect to Temporal Cloud using an API key
To use an API key with the Temporal Python SDK, you will need to provide additional connection options:
- Your API Key value
- Your Namespace and Account id combination, which follows the format
<namespace_id>.<account_id>. - The endpoint may vary. The most common endpoint used is the gRPC regional endpoint, which follows the format:
<region>.<cloud_provider>.api.temporal.io:7233. - For Namespaces with High Availability features with API key authentication enabled, use the gRPC Namespace endpoint:
<namespace>.<account>.tmprl.cloud:7233. This allows automated failover without needing to switch endpoints.
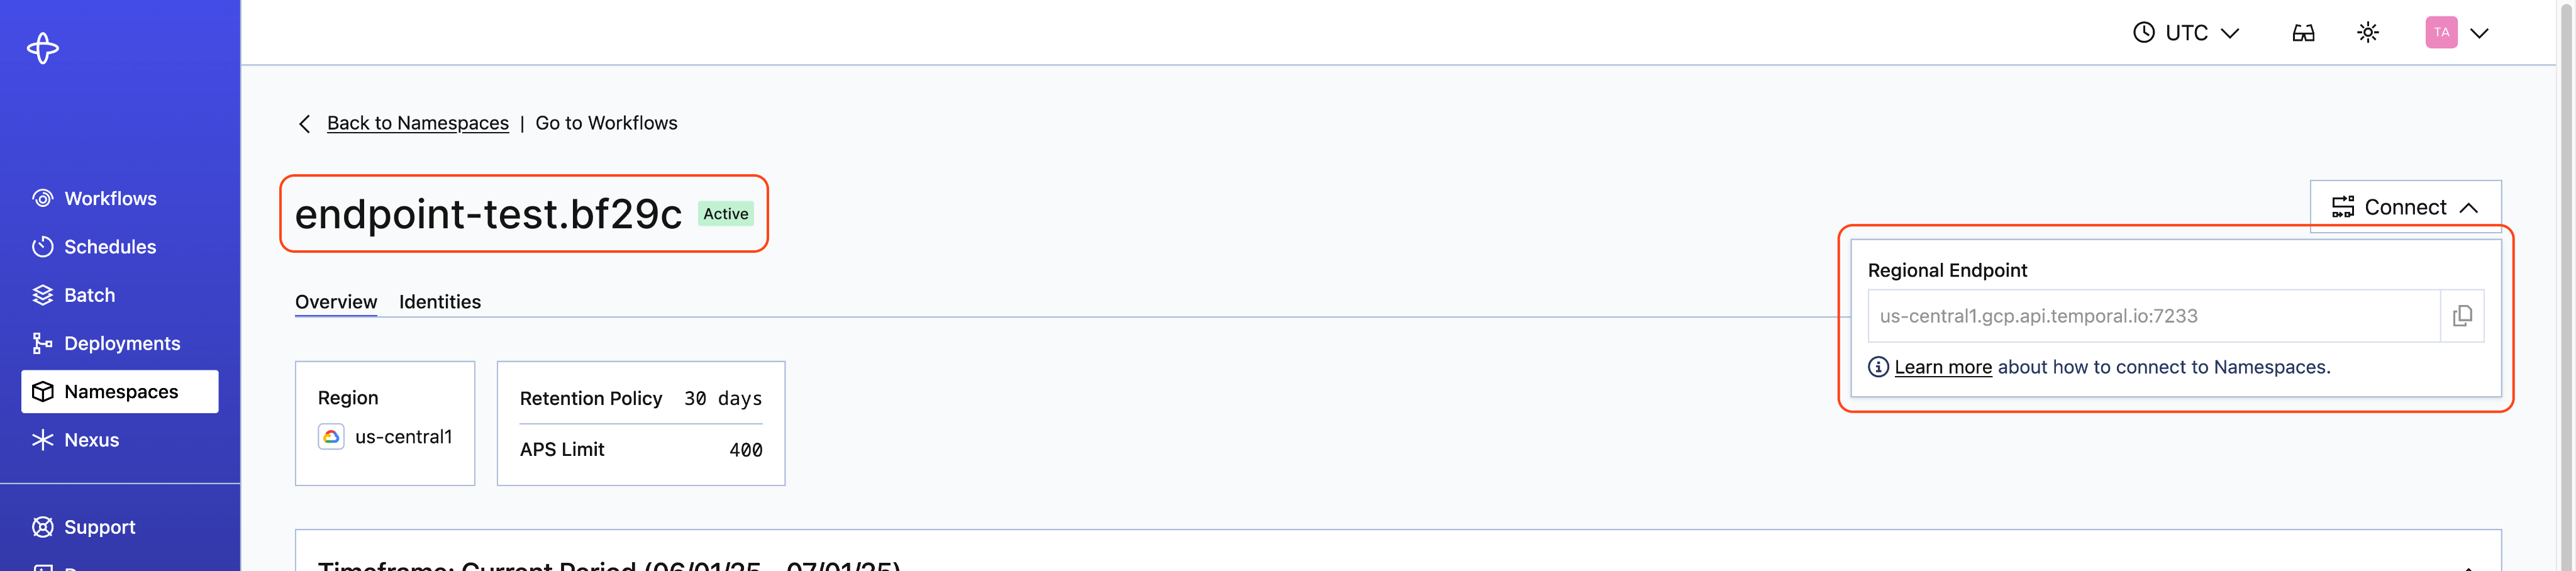
You can find the Namespace and Account ID, as well as the endpoint, on the Namespaces tab:
Now, when instantiating a Temporal client in your Temporal Python SDK code, provide the API key:
client = await Client.connect(
    <endpoint>,
    namespace=<namespace_id>.<account_id>,
    api_key=<APIKey>,
    tls=True,
)
To update an API key, replace the api_key parameter:
client.api_key = my_key_updated
How to connect to Temporal Cloud using TLS
When you connect to Temporal Cloud, you need to provide additional connection and client options that include the following:
- The Temporal Cloud Namespace Id.
A Namespace Id is made up of a Namespace name appended by your unique five- or six-digit Temporal Cloud Account Id.
You can find this Account Id in the URL of your Namespace and on the "Namespaces" page on the Temporal Cloud website.
For example, in
https://cloud.temporal.io/namespaces/yournamespacename.a2fx6/, your Account Id isa2fx6. The fully qualified Namespace Id for your client with this Namespace isyournamespacename.a2fx6. - The Namespace's gRPC endpoint. An endpoint listing is available at the Temporal Cloud Website on each Namespace detail page. The endpoint contains the Namespace Id and port.
- mTLS CA certificate.
- mTLS private key.
For more information about managing and generating client certificates for Temporal Cloud, see How to manage certificates in Temporal Cloud.
For more information about configuring TLS to secure inter- and intra-network communication for a Temporal Service, see Temporal Customization Samples.
Use the connect() method on the Client class to create and connect to a Temporal Client to the Temporal Service.
Then specify the TLSConfig arguments to connect to a Temporal Service with TLS enabled.
The client_cert must be combined with client_private_key to authenticate the Client.
View the source code
in the context of the rest of the application code.
from temporalio.client import Client, TLSConfig
# ...
# ...
async def main():
    with open("client-cert.pem", "rb") as f:
        client_cert = f.read()
    with open("client-private-key.pem", "rb") as f:
        client_private_key = f.read()
    client = await Client.connect(
        "your-custom-namespace.tmprl.cloud:7233",
        namespace="<your-custom-namespace>.<account-id>",
        tls=TLSConfig(
            client_cert=client_cert,
            client_private_key=client_private_key,
            # domain=domain, # TLS domain
            # server_root_ca_cert=server_root_ca_cert, # ROOT CA to validate the server cert
        ),
    )
Start a Workflow Execution��
How to start a Workflow Execution using the Python SDK
Workflow Execution semantics rely on several parameters—that is, to start a Workflow Execution you must supply a Task Queue that will be used for the Tasks (one that a Worker is polling), the Workflow Type, language-specific contextual data, and Workflow Function parameters.
In the examples below, all Workflow Executions are started using a Temporal Client. To spawn Workflow Executions from within another Workflow Execution, use either the Child Workflow or External Workflow APIs.
See the Customize Workflow Type section to see how to customize the name of the Workflow Type.
A request to spawn a Workflow Execution causes the Temporal Service to create the first Event (WorkflowExecutionStarted) in the Workflow Execution Event History. The Temporal Service then creates the first Workflow Task, resulting in the first WorkflowTaskScheduled Event.
To start a Workflow Execution in Python, use either the start_workflow() or execute_workflow() asynchronous methods in the Client.
View the source code
in the context of the rest of the application code.
# ...
async def main():
    client = await Client.connect("localhost:7233")

    result = await client.execute_workflow(
        YourWorkflow.run,
        "your name",
        id="your-workflow-id",
        task_queue="your-task-queue",
    )

    print(f"Result: {result}")


if __name__ == "__main__":
    asyncio.run(main())
Set a Workflow's Task Queue
How to set a Workflow's Task Queue using the Python SDK
In most SDKs, the only Workflow Option that must be set is the name of the Task Queue.
For any code to execute, a Worker Process must be running that contains a Worker Entity that is polling the same Task Queue name.
To set a Task Queue in Python, specify the task_queue argument when executing a Workflow with either start_workflow() or execute_workflow() methods.
View the source code
in the context of the rest of the application code.
# ...
async def main():
    client = await Client.connect("localhost:7233")

    result = await client.execute_workflow(
        YourWorkflow.run,
        "your name",
        id="your-workflow-id",
        task_queue="your-task-queue",
    )

    print(f"Result: {result}")


if __name__ == "__main__":
    asyncio.run(main())
Set a Workflow Id
How to set a Workflow Id using the Python SDK
You must set a Workflow Id.
When setting a Workflow Id, we recommended mapping it to a business process or business entity identifier, such as an order identifier or customer identifier.
To set a Workflow Id in Python, specify the id argument when executing a Workflow with either start_workflow() or execute_workflow() methods.
The id argument should be a unique identifier for the Workflow Execution.
View the source code
in the context of the rest of the application code.
# ...
async def main():
    client = await Client.connect("localhost:7233")

    result = await client.execute_workflow(
        YourWorkflow.run,
        "your name",
        id="your-workflow-id",
        task_queue="your-task-queue",
    )

    print(f"Result: {result}")


if __name__ == "__main__":
    asyncio.run(main())
Get the results of a Workflow Execution
How to get the results of a Workflow Execution using the Python SDK
If the call to start a Workflow Execution is successful, you will gain access to the Workflow Execution's Run Id.
The Workflow Id, Run Id, and Namespace may be used to uniquely identify a Workflow Execution in the system and get its result.
It's possible to both block progress on the result (synchronous execution) or get the result at some other point in time (asynchronous execution).
In the Temporal Platform, it's also acceptable to use Queries as the preferred method for accessing the state and results of Workflow Executions.
Use start_workflow() or get_workflow_handle() to return a Workflow handle.
Then use the result method to await on the result of the Workflow.
To get a handle for an existing Workflow by its Id, you can use get_workflow_handle(), or use get_workflow_handle_for() for type safety.
Then use describe() to get the current status of the Workflow.
If the Workflow does not exist, this call fails.
View the source code
in the context of the rest of the application code.
# ...
async def main():
    client = await Client.connect("localhost:7233")

    handle = client.get_workflow_handle(
        workflow_id="your-workflow-id",
    )
    results = await handle.result()
    print(f"Result: {results}")


if __name__ == "__main__":
    asyncio.run(main())